Saturday 25 February 2017

Cura setup guide for Mac by Wayne Knight

So assuming you have your printer up and running and you've managed to print some test prints off the 101hero site using the SD, you want to move on to printing files from other sites like Thingiverse, or make your own models.

Setting up Cura on the a Mac is similar to that on a Windows based system.
Cura step by step For Macs ...
Make sure you've downloaded the correct version of Cura (15.02.1) or 15.4 also works so either one can be installed https://ultimaker.com/en/products/cura-software/list (be sure to scroll down to the macOS section of the download page).  Also download the Mac “Driver” file from 101hero, the official download page.

Install the “Driver” file then then install the Cura program.
(Please note that since my Cura program is already set up for the 101Hero, your initial set-up may look a little different from my accompanying screen shots.)
Start Cura: this is basically what you start screen should look like.


From here, move the mouse pointer to the top of the screen to show the Cura “Top Menu”:


Click on “Machine” select “Add New Machine” and the following screen should open:


Select “Next”


Select “Other”

Then enter the following data into the chart:

Click “Finish” and it should take you back to the Cura “Start Page” move the mouse to open the “Top Home Menu” again and move to “Machine” again and scroll down and click on “Machine Settings” to open the following screen. You should now see 101 Hero listed as a selection in the “Machine Settings”


Enter the data below in the “Machine Settings” table as shown below.

NOTE: Under “Communications settings” for the “Serial Port” click on the selection arrow. You should see “/dev/cu.SLAB_USBtoUART” as an option. Select it, set the
Baudrate to 115200 and click “OK”.


You need to be aware that the machine settings of width 105 and length 105 set the diameter of the round virtual print bed in Cura, but the effective print size of the 101Hero is only about 100mm or so. This means that wide objects that fit on the virtual print bed may not actually print properly.

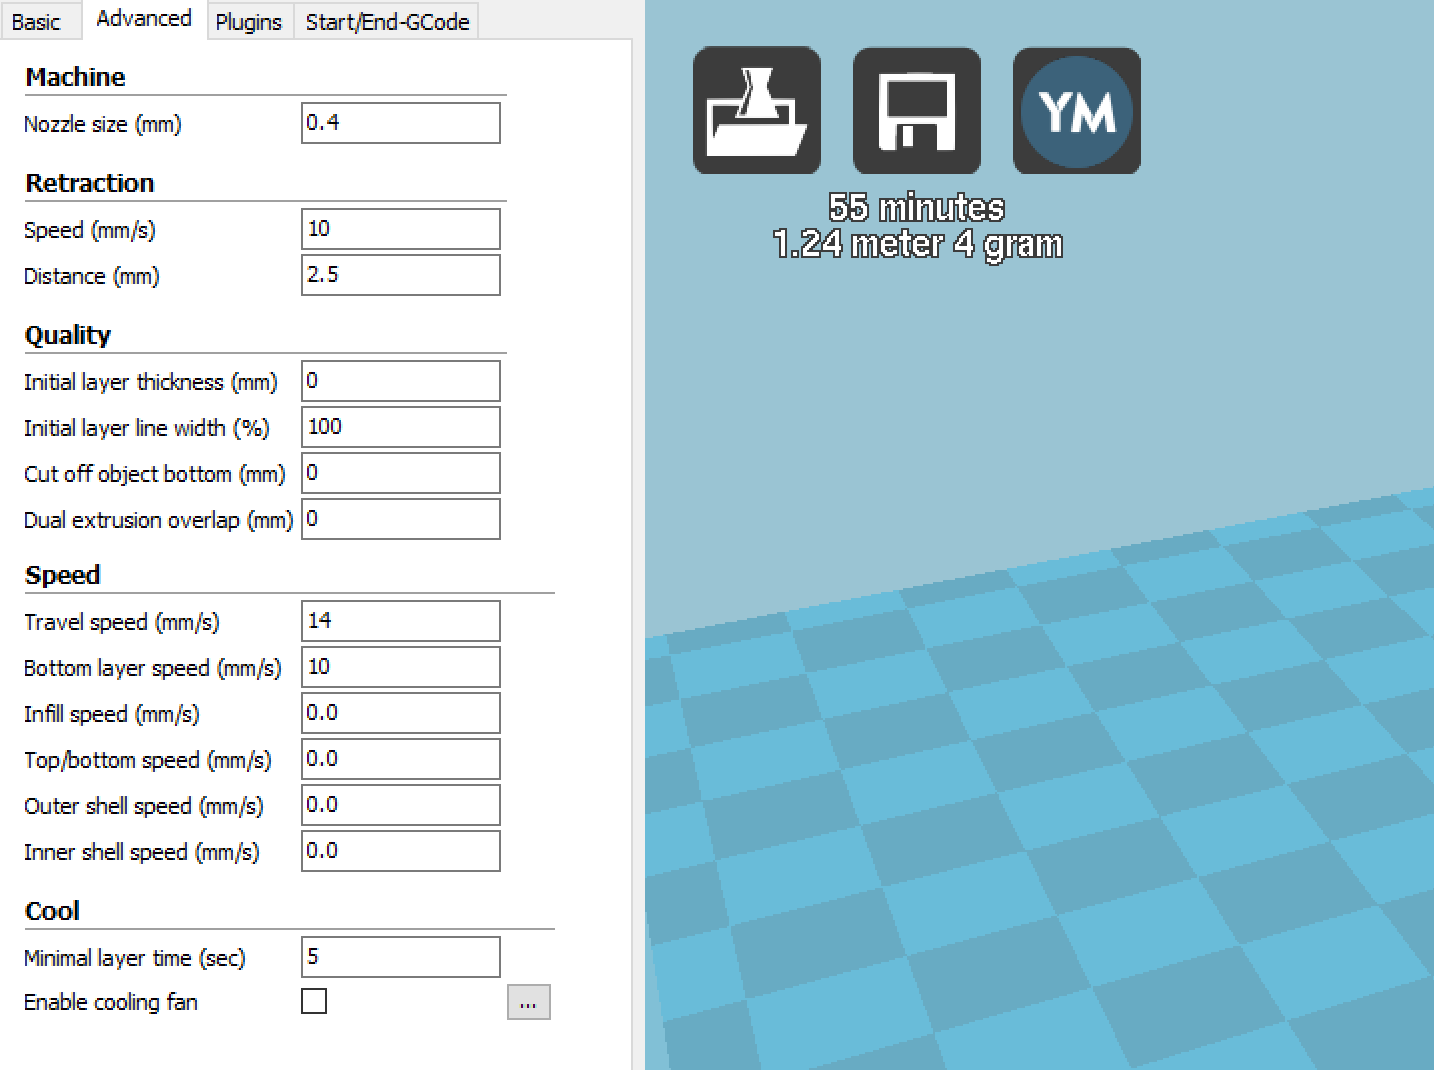
That should return you to the Cura “Start Menu” where you can enter the information for the:


Basic settings tab:


and the advanced settings tab:


I have not made any changes to Plugins or Start/End GCode

An additional change you may want to make is to configure the printer interface from basic to Pronterface - this gives you some additional information and controls.

Go to “File”- “Preferences” on the Cura “Top Menu”

Now change the interface to Pronterface UI


That's it.  Now you can load a model from Thingiverse or any other stl file and print over USB or save it to SD and print.

Wednesday 18 January 2017

Basic Troubleshooting for your Hero

So your Hero is acting like a Zero - not printing or printing very poorly.


While I cannot promise that all can be fixed, there could very possibly be a mechanical fault, some users have reported broken step motors, faulty working thermostats, missing limiter switches, broken glass plates, the list goes on. 

I seemed to have been one of the lucky one's and received a working blue model mid December 2016, so below are a few things I have picked up form the Facebook group which MAY resolve some of the issues you may be having.


Is the printer on? 

This may sounds funny however when the USB cable is plugged in the red LED lights up, regardless of the switch position and power supply being plugged in. So make sure that the printer is in fact on, easiest way to check is to remove the USB cable and mark the switch in either on or off position (or both).

Make sure all the cables are connected securely, double check all your plugs, the build quality of this printer is fair so you could easily have a loose connection causing problems.


Filament feeder

Also covered in the getting started guide https://101hero3d.blogspot.co.za/2017/01/getting-started-with-101-hero-3d-printer.html, make sure the filament is all the way in, the "door" screws must be tight but be careful not to strip them, and also check the bearing, a little bit of lube could make all the difference, adding lube to the pylons also won't hurt the printer and is recommended as the motors are very delicate and anything we can do to help reduce the stress on them should be done.


SD card size and formatting: 

It is recommended to use a 16gig or smaller SD card formatted in FAT32, larger cards are tricky to format in FAT32, and since you can only have 1 print file on the card named "101hero" without an extension there is no need for anything larger than 4gigs

Printing bed:

Also in the getting started guide https://101hero3d.blogspot.co.za/2017/01/getting-started-with-101-hero-3d-printer.html, get some painters blue tape and use it instead of that yellow stuff that came in the box, in addition you can use some glue or hairspray on top of that tape for extra adhesion.


Calibration:

Calibrating this printer is tricky the calibration screws are difficult to work with, I have replaced mine with Allen key screws, this makes small adjustments much easier. Ideally, you want to slide a piece of paper between the nozzle and the print bed. To bring the nozzle down you need to unscrew (make the screws taller) and similarly raise the nozzle by turning the screws in a little. There have been reports that later printers already Allen key screws already in place. I print the star file off the official hero site using the SD after every adjustment until I am satisfied that the print is even on all sides.

Hope you find the answers you are looking for, post your comments and questions below I will try to answer them, Happy Printing.


Monday 9 January 2017

Cura Setup Guide (Windows)

So assuming you have your printer up and running and you've managed to print some test prints off the 101hero site using the SD, you want to move on the printing off other sites like Thingiverse or make your own models.

Setting up Cura has been briefly covered in my previous post but here I'll go into more detail, the next post will cover which settings can possibly produce higher quality prints

Cura step by step...

Make sure you've downloaded the correct version of Cura (15.02.1) or 15.4 also works so either one can be installed https://ultimaker.com/en/products/cura-software/list and the config file off 101hero the official download page

Once you have installed Cura go to File --> Open Profile and choose the 101hero provided config file. It needs to be unzipped Cura wants a .ini file


Click on Machine -->Add New Machine


Click Next --> Choose Other


Click Next and fill in as below:

Click Finish and go back to Machine Settings and change the build area to circular and change the comm port to the correct board rate you can find it in your computer's system settings and baudrate to 115200


You need to be aware that the machine settings of width 105 and length 105 set the diameter of the round virtual print bed in Cura, but the effective print size of the 101Hero is only about 100mm or so. This means that wide objects that fit on the virtual print bed may not actually print properly.

Basic settings tab:


Advanced settings tab:


I have not made any changes to Plugins or Start/End GCode

An additional change you may want to make is to configure the printer interface from basic to pronterface - this gives you some additional information and controls.

Go to File Preferences


Now change the interface to Pronterface UI


That's it now you can load a model from Thingiverse and print over USB or save it to SD and print


Getting Started with the 101 Hero 3D Printer

Your printer has finally arrived and you must be excited congratulations! - I decided to write this blog to try and create a central place for all the info I have gathered around this printer. It is my hope that it will assist you in putting your printer together successfully and producing some prints, most of the information here was gathered off the 101Hero unofficial Facebook page, Tom Gray’s blog posts http://blog.graywriterrv.com/?p=1600, Daiju Ishikawa’s blog post (in Japanese) https://fabcross.jp/category/make/20170104_101hero_01.html and my own experiences. I hope you find it useful.

Very important!

Inspect the parts, especially the limit switches at the top of the pylons see pic below: 


You can gently click them with a screw driver to make sure they click - they very are important as they make the motor stop once it homes.

The 101Hero Video

The instruction manual points to this video which is great however as the stepping motors are very fragile and can cause problems (break) it is suggested that instead of moving the parts manually as can be seen in the video from 101HERO On Vimeo Start Guide Of Quick 101HERO Pylon 3D Printer around the 2:48 mark rather assemble the printer flat. On page 7 of the manual is a wiring diagram follow this then download the “BACK HOME” file from the official download page onto a clean FAT32 formatted SD card and let the motors run up the pylons themselves.

It is also suggested to connect the motors in a counterclockwise manner from above in order A, B, then C.
The rest of the assembly should be done as per the video and manual, with the exception of some of the upgrades or recommendations below.


Upgrades and Recommendations


Most importantly ensure the filament is inserted all the way in and the door screws are tight (Do Not Strip Them!)
Blue painters tape is recommended instead of the supplied yellow masking tape.


Replacing the plastic rods and reinforcing them with cable ties, springs or rubber bands as can be seen in this post http://blog.graywriterrv.com/?p=1600
The filament supplied with the printer is of poor quality so it is suggested to use a better one, basically buy your own off amazon or another reputable seller.
Add a cooling fan, a 40x40mm is sufficient but should be powered off a separate PSU as the supplied one is only 3 amps.

I printed the upgraded filament feeder holder Hannes Brandstätter-Müller from

The SD cover by Tom Gray


Platform Clips and LED Holders by Tom Gray (also a picture of the blue painter's tape)


All these files are available from the 101Hero unofficial Facebook page under the files tab.

My printer uses loom bands as supports I am however wanting to change these to springs and upgrade the rods to carbon as soon as I find the correct size.


I also printed and made this adjustable spool holder off Thingiverse and I highly recommend something like it for your filament rolls http://www.thingiverse.com/thing:1902417


I pimped my printer and added LED strips on the inside of the pylons, they illuminate the print bed especially at night - these like the fan are powered off a separate Power Supply.


Another item worth printing and using is the controller Pylon Holder for 101 Board Block by Stéphane Keep Hérault (I am not using it as I use velcro and since my wires are spiral wrapped they do not reach the centre of the pylon)


Stefano Marcon has been hard at work finding replacement motors - he has a google doc's spreadsheet which if you add your name to you will be included in the order for the replacement motors - the price for the motors is about USD1/each however the problem is shipping. 
Make sure you have power plugged in and the switch turned on a red light will appear on the controller box.
The SD card must be formatted FAT32 and all the print files must be named 101hero (without extension) - so basically 1 file at a time
If you want to print other non 101Hero supplied models
Download the correct driver files from the official download page
A slicer like Cura (it’s free) is needed, make sure you download the correct version of Cura (15.02.1, 15.04 or 15.04.6) https://ultimaker.com/en/products/cura-software/list
Also download the config file from the official download page
And use the settings as per the screen shots also on the Facebook group
There are two config files for Simplify3D (not free) courtesy of Hannes Brandstätter-Müller on and myself on the Facebook group.